Manager & Staff Getting Started Guide
This section provides general steps on how to set up your office in UCI Appointments and manage client appointments.
Office Setup Overview
- Navigate to the Setup & Settings tab. Add your users.
- Navigate to Master Calendars & Groups. Set up a master calendar for your Advising Office with specific options (name, Mon-Fri 8:00 AM to 5 PM, self-booking, etc.)
Note: If you don’t want students to self-book appointments, leave the Allow Students to book appointments box unchecked. - Go to User Calendars and create advising calendars for your staff.
- Create availability by clicking the New Availability button under the Master Schedules and User Schedules sub-tab.
- Your office is now using Appointments. Students can book appointments online, and the tool syncs with the advisor’s Outlook calendar.
Managing Client Appointments
On the “My Calendar” tab, advisors or managers can see and manage their upcoming appointments, add availability, and change their notification settings.
Checking Clients Into Appointments
There are two ways to check a client into their appointment.
From My Calendar > My Appointments:
- Navigate to the desired appointment and click on it.
- Click on the checkbox for Checked In.
- When a green checkmark appears, the person has been checked in.
From Master Calendar > Check In Calendar or Master Calendar > Master Calendar:
- Find the client to check in (if necessary, navigate to the correct date and Master Calendar drop-down item).
- Select the box labeled Checked In.
- Once a checkmark appears, the person has been checked in.
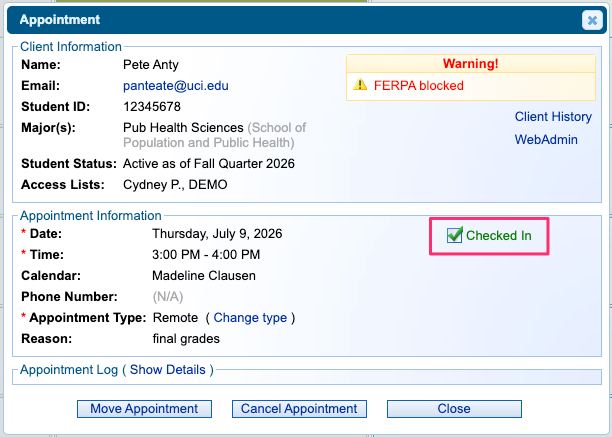
If a person is not checked in before their appointment and wrongly receives a no-show penalty, any office user can remove that person from the penalty list. Only a manager or the person with whom the appointment was made can retroactively mark someone as checked in.
Creating an Appointment
- Click on an open appointment slot. You will be prompted to either find the client or create a new client record.
- Enter some search criteria to find a client, and then press Search. Click on the client to proceed.
Note: Alternatively, you can click the Add Non-UCI Client link to open a blank form, which will prompt you to manually enter the client’s information. This feature allows you to create and log appointments for anyone – even people such as parents or prospective students. - Once you select the client, any available information will be filled in on the following screen.
- Click Create Appointment to book the entered appointment for the client.
The following video walks through the steps mentioned above.
Moving an Appointment
- Click the appointment you wish to move to open the appointment details, then click Move Appointment. The appointment details window will close, and the move bar will appear at the top of the calendar screen.
- Select an open appointment slot as the destination for moving this appointment. You can navigate to different weeks if needed.
Note: You cannot select a booked appointment slot as the destination unless you are swapping the appointment (see section below). - The move confirmation window will appear once you click on a valid destination appointment slot.
- Click Apply Move to confirm the move.
- To completely cancel the move and leave the appointment in its original location, click Cancel Move.
- To pick a different destination appointment slot, click Close, then select an alternate destination.
The following video walks through the steps mentioned above.
Swapping an Appointment
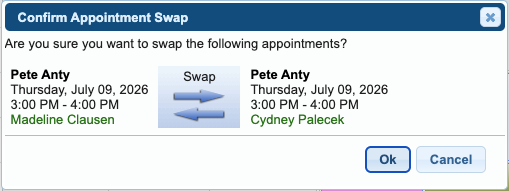
Swapping two appointments is the process of switching two appointments, which have the same appointment date and time, between user calendars. While this is not often done, it can be used if two advisors need to switch which clients they are meeting with. To swap two appointments:
- Select the first appointment and initiate an appointment move (see above). As the destination location, select an appointment at the same time. The following appointment swap confirmation screen will appear.
- Press OK to confirm the swap.
Canceling an Appointment
- Click the appointment you wish to cancel.
- Click Cancel Appointment. The appointment cancellation window will open, prompting the user to enter the reason for the cancellation.
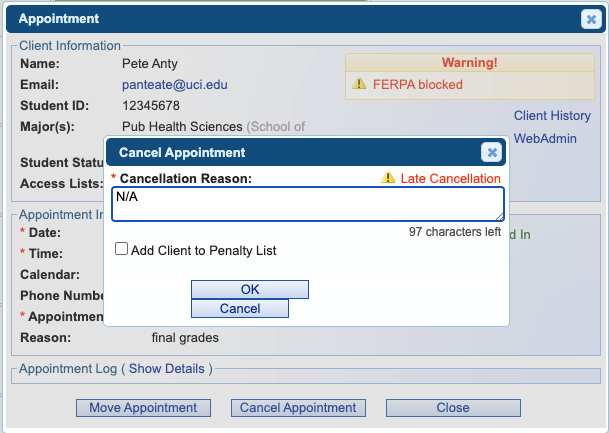
Note: If the cancellation is considered a late cancellation, based on the penalty settings, it will be indicated in the upper right of the appointment cancellation window. If you proceed with a late cancellation, the client will be placed on the penalty list for having an appointment canceled with too little notice. Additionally, an email notification is generated to the advisor with whom the appointment was made for all late cancellations.